概要
Glide是一个快速高效的android图片加载库,注重于平滑的滚动。Glide提供了易用的API,高性能、可扩展的图片解码管道,以及自动的资源池计数。
Glide支持拉取,解码和展示视频快照,图片,和GIF动画,开发者甚至可以插入和替换成自己喜爱的任何网络栈。默认情况下,Glide使用的是一个定制化的基于HttpUrlConnection的栈,但同时也提供了与Google Volley和Square OkHttp快速集成的工具库。
虽然Glide的主要目标是让任何形式的图片列表的滚动尽可能地变得更快、更平滑,但实际上,Glide几乎能满足你对远程图片的拉取。缩放、显示的一切需求。
Glide使用简明的链式调用API,使用方法如下:
|
|
Glide充分考虑了android图片即在性能的两个关键方面:
- 图片解码速度
- 解码图片带来的资源压力
为了让用户拥有良好的app使用体验,图片不仅要快速加载,而且还不能因为过多的主线程I/O或频繁的垃圾回收导致页面的闪烁和抖动现象。
Glide使用了多个步骤来确保在android上加载图片尽可能的快速和平滑:
- 自动、智能地采样和缓存,以最小化存储开销和解码次数
- 积极的资源重用,例如字节数组和Bitmap,以最小化昂贵的垃圾回收和堆碎片影响
- 深度的生命周期集成,以确保仅优先处理活跃的fragment和activity的请求,并有利于应用在必要时释放资源以避免早期后台时被杀掉
Glide的生命周期绑定
Glide是一个性能优良的第三方网络图片加载框架,在节省内存和快速加载方面具有较好体现。究其内部机制,发现其优良性能得益于以下几点:
- 与使用环境生命周期绑定:RequestManagerFragment & SupportRequestManagerFragment
- 内存的三级缓存池:LruMemoryResources,ActiveResources,BitmapPool
- 内存复用机制:BitmapPool
Glide绑定生命周期的优点
- 可以实现网络请求根据生命周期而暂停、执行、恢复、释放等
- 可以实现资源比如图片的自动释放
- 降低了内存的压力
- 降低了内存泄漏的风险
Glide绑定生命周期原理
- 原理的知识基础:FragmentManager中的所有fragment都与FragmentManager所处的context生命周期绑定
- Glide定义了RequestManagerFragment和SupportRequestManagerFragment两种fragment。该两类Fragment不具有任何界面和其他功能,通过入口传入的context获取的FragmentManager绑定生命周期到context上
- Glide内部的生命周期机制进一步通过基于RequestManagerFragment的生命周期接口的回调实现
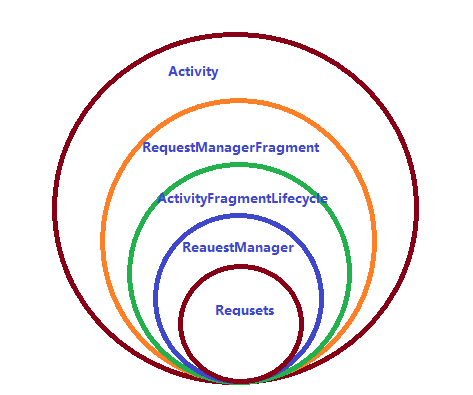
Glide生命周期回调示意图
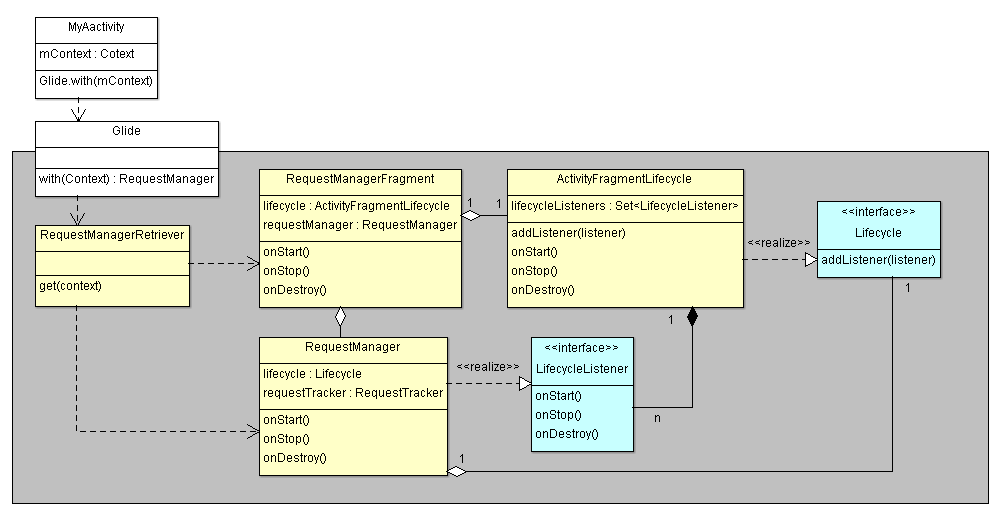
Glide生命周期绑定机制类图
Glide生命周期绑定机制时序图

Glide的请求管理机制
Glide的with()方法获取了RequestManager对象,load()方法设置Request对象需要的资源链接,into()方法获取Request对象并绑定viewTarget发起网络请求。代码十分简洁,但是内部功能十分强大,比如:
- request的生命周期管理
- viewTarget的生命周期管理
- 资源的复用和释放
- 灵活的配置(request的builder构建者模式)
request及其生命周期管理
从上文可知,Glide的with()方法获取了RequestManager对象,load()方法设置Request对象需要的资源链接,into()方法获取Request对象并绑定viewTarget发起网络请求。
Glide请求管理机制类图

如上图所示:
- RequestManager持有一个RequestTracker对象requestTracker
- requestTracker对象维护request的队列集合
- RequestManager的load()方法最终会调用RequestBuilder的load()方法,RequestBuilder的load()方法内部调用loadGeneric()方法,最终把model设置好即完成request的URL设置后并返回RequestBuilder对象
- RequestBuilder的into()方法是实际产生request和消费request的地方
- RequestBuilder的into(target)方法最终会调用obtainRequest()方法获取SingleRequest对象request,request与target相互绑定并被requestTracker维护
Glide的内存缓存机制
不同于其他常见的网络加载框架只有LruCatch一种缓存机制,Glide内存为三块:
- ActiveResourceCache:缓存当前正在使用的资源(注意是弱引用)
- LruResourceCache:缓存最近使用过但是当前未使用的资源,LRU算法
- BitmapPool:缓存所有被释放的图片,内存复用,LRU算法
首先来看一下源码实现原理。
|
|
|
|
|
|

- 当我们需要显示某个资源时,Glide会先去查找LruResourceCache,找到了则将从LruResourceCache移除加入到ActiveResourceCache
- LruResourceCache找不到资源则查找ActiveResourceCache
- 如果在ActiveResourceCache也找不到合适的资源,则会根据加载策略从硬盘或者网络加载资源
- 分别使用engineJobFactory和decodeJobFactory构建EngineJob和DecodeJob对象,这两个对象是真正的加载资源的两个重要类,EngineJob对象负责开启线程去加载资源,并且加载到资源后转换到子线程并进行回调,DecodeJob是真正的执行者,它就是网络加载资源的地方,EngineJob开启线程,真正执行的是DecodeJob,DecodeJob执行完毕之后回到EngineJob去分发回调
- 获取数据后Glide会从BitmapPool中找寻合适的可供内存复用的废弃recycled bitmap(找不到则会重新构建bitmap对象),然后刷新bitmap的数据
- bitmap被转换封装为Resource缓存入ActiveResourceCache和Request对象中
- Request的target会获取resource中引用的bitmap并展示
- 当target的资源需要release时,resource会根据缓存策略被缓存到LruResourceCache,同时ActiveResourceCache中的弱引用会被删除。如果该资源不能缓存到LruResourceCache,则资源被recycle到BitmapPool
- 当需要回收内存时(比如系统内存不足或者生命周期结束),LruResourceCache将根据LRU算法recycle一些resource到BitmapPool
- BitmapPool会根据缓存池的尺寸和recycled resource的缓存策略来缓存resource的bitmap
- BitmapPool会根据LRU算法和缓存池的尺寸来释放一些老旧资源
- 当系统GC时,则会回收可回收的资源释放内存
再来看一下Glide内存复用机制
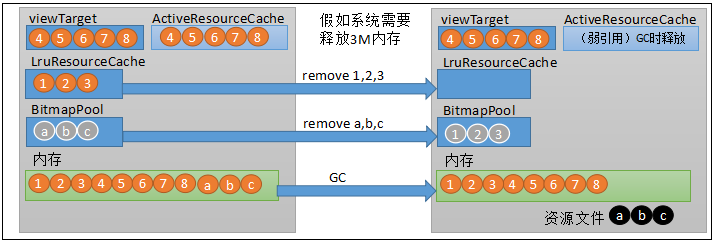
如图,当系统内存不足时,LruResourceCache会根据LRU算法移除一些资源(resource)到BitmapPool,到Bitmap会根据LRU算法移除一些资源(bitmap),当应用再次需要资源时,会有限复用到BitmapPool中的bitmap对象(复用其内存),只需刷新bitmap的像素数据。这样能有效地降低内存抖动,由于很多情况下可以复用废弃bitmap的内存,因此避免了内存分配等造成的性能损耗,系统比较流畅,降低了系统GC的频率。
Glide的网络请求原理
从上文可知,DecodeJob是网络加载资源的地方,DecodeJob实现了Runnable,下面看一下其run()方法。
|
|
追踪到runWrapped()方法。
|
|
|
|
|
|
|
|
不难看出来,网络请求原理逻辑主要在currentGenerator.startNext()这句代码上面,而currentGeneric的实现类是SourceGenerator,所以可以定位到SourceGenerator的startNext()方法。
|
|
SourceGenerator的startNext()方法最主要的逻辑在于while循环,关键代码是:
|
|
loadData的fetcher实现类是HttpUrlFetcher,这是在Glide构造registry时候注册进去的实现类,所以其loadData()方法就是主要的实现逻辑。
|
|
|
|
可以看到Glide的网络请求是基于我们平时比较熟悉的HttpURLConnection,通过HttpURLConnection的connect()方法连接网络获取文件数据流,把文件数据流拉取到内存之后,就开始了图片解码的工作。
Glide的解码工作还是比较复杂繁琐的,具体可以参照以下下面这篇博文。
android图片加载框架Glide4.0源码完全解析(二)