Glide框架源码解析

概要

Glide是一个快速高效的android图片加载库,注重于平滑的滚动。Glide提供了易用的API,高性能、可扩展的图片解码管道,以及自动的资源池计数。

Glide支持拉取,解码和展示视频快照,图片,和GIF动画,开发者甚至可以插入和替换成自己喜爱的任何网络栈。默认情况下,Glide使用的是一个定制化的基于HttpUrlConnection的栈,但同时也提供了与Google Volley和Square OkHttp快速集成的工具库。

虽然Glide的主要目标是让任何形式的图片列表的滚动尽可能地变得更快、更平滑,但实际上,Glide几乎能满足你对远程图片的拉取。缩放、显示的一切需求。

Glide使用简明的链式调用API,使用方法如下:

1
2
3
Glide.with(context)
.load(url)
.into(imageView);

Glide充分考虑了android图片即在性能的两个关键方面:

  • 图片解码速度
  • 解码图片带来的资源压力

为了让用户拥有良好的app使用体验,图片不仅要快速加载,而且还不能因为过多的主线程I/O或频繁的垃圾回收导致页面的闪烁和抖动现象。

Glide使用了多个步骤来确保在android上加载图片尽可能的快速和平滑:

  • 自动、智能地采样和缓存,以最小化存储开销和解码次数
  • 积极的资源重用,例如字节数组和Bitmap,以最小化昂贵的垃圾回收和堆碎片影响
  • 深度的生命周期集成,以确保仅优先处理活跃的fragment和activity的请求,并有利于应用在必要时释放资源以避免早期后台时被杀掉

Glide的源码地址

Glide的生命周期绑定

Glide是一个性能优良的第三方网络图片加载框架,在节省内存和快速加载方面具有较好体现。究其内部机制,发现其优良性能得益于以下几点:

  • 与使用环境生命周期绑定:RequestManagerFragment & SupportRequestManagerFragment
  • 内存的三级缓存池:LruMemoryResources,ActiveResources,BitmapPool
  • 内存复用机制:BitmapPool

Glide绑定生命周期的优点

  • 可以实现网络请求根据生命周期而暂停、执行、恢复、释放等
  • 可以实现资源比如图片的自动释放
  • 降低了内存的压力
  • 降低了内存泄漏的风险

Glide绑定生命周期原理

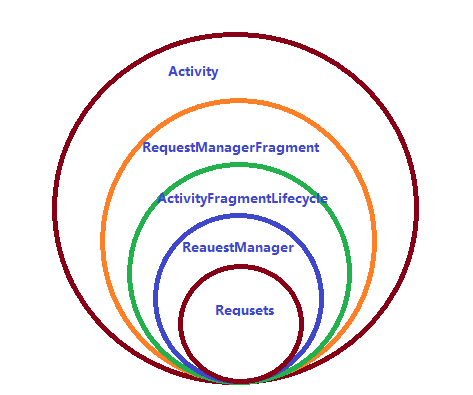
  • 原理的知识基础:FragmentManager中的所有fragment都与FragmentManager所处的context生命周期绑定
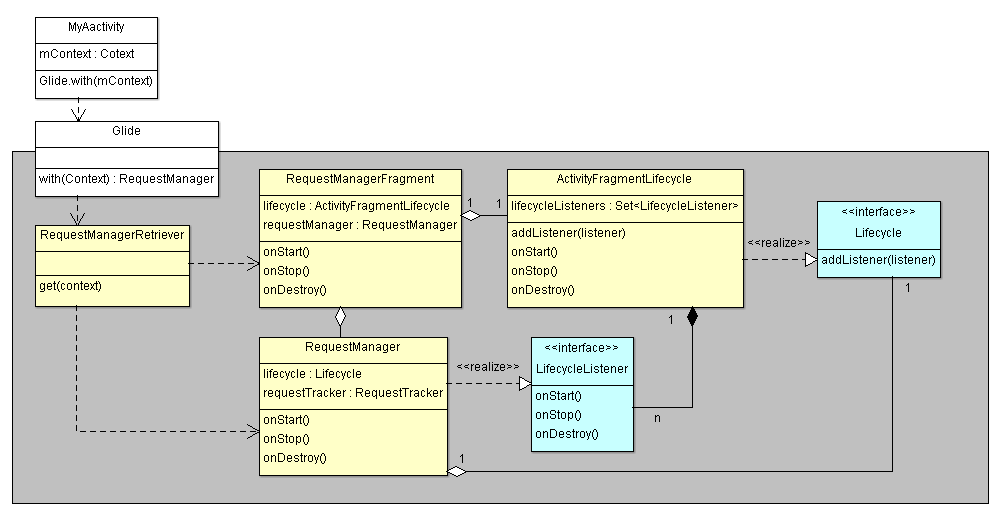
  • Glide定义了RequestManagerFragment和SupportRequestManagerFragment两种fragment。该两类Fragment不具有任何界面和其他功能,通过入口传入的context获取的FragmentManager绑定生命周期到context上
  • Glide内部的生命周期机制进一步通过基于RequestManagerFragment的生命周期接口的回调实现

Glide生命周期回调示意图
Glide生命周期绑定机制类图
Glide生命周期绑定机制时序图

Glide的请求管理机制

Glide的with()方法获取了RequestManager对象,load()方法设置Request对象需要的资源链接,into()方法获取Request对象并绑定viewTarget发起网络请求。代码十分简洁,但是内部功能十分强大,比如:

  • request的生命周期管理
  • viewTarget的生命周期管理
  • 资源的复用和释放
  • 灵活的配置(request的builder构建者模式)

request及其生命周期管理

从上文可知,Glide的with()方法获取了RequestManager对象,load()方法设置Request对象需要的资源链接,into()方法获取Request对象并绑定viewTarget发起网络请求。

Glide请求管理机制类图

如上图所示:

  • RequestManager持有一个RequestTracker对象requestTracker
  • requestTracker对象维护request的队列集合
  • RequestManager的load()方法最终会调用RequestBuilder的load()方法,RequestBuilder的load()方法内部调用loadGeneric()方法,最终把model设置好即完成request的URL设置后并返回RequestBuilder对象
  • RequestBuilder的into()方法是实际产生request和消费request的地方
  • RequestBuilder的into(target)方法最终会调用obtainRequest()方法获取SingleRequest对象request,request与target相互绑定并被requestTracker维护

Glide的内存缓存机制

不同于其他常见的网络加载框架只有LruCatch一种缓存机制,Glide内存为三块:

  • ActiveResourceCache:缓存当前正在使用的资源(注意是弱引用)
  • LruResourceCache:缓存最近使用过但是当前未使用的资源,LRU算法
  • BitmapPool:缓存所有被释放的图片,内存复用,LRU算法

首先来看一下源码实现原理。

1
2
3
4
5
6
7
8
9
10
11
12
13
14
15
16
17
18
19
20
21
22
23
24
25
26
27
28
29
30
31
32
33
34
35
36
37
38
39
40
41
42
43
44
45
46
47
48
49
50
51
52
53
54
55
56
57
58
59
60
61
62
63
64
65
66
67
68
69
70
71
72
73
74
75
76
77
78
79
80
public <R> LoadStatus load(
GlideContext glideContext,
Object model,
Key signature,
int width,
int height,
Class<?> resourceClass,
Class<R> transcodeClass,
Priority priority,
DiskCacheStrategy diskCacheStrategy,
Map<Class<?>, Transformation<?>> transformations,
boolean isTransformationRequired,
Options options,
boolean isMemoryCacheable,
boolean useUnlimitedSourceExecutorPool,
boolean onlyRetrieveFromCache,
ResourceCallback cb) {
// 判断是否在主线程中个运行,说明到目前为止还是在主线程执行的,并没有真正的开启子线程
Util.assertMainThread();
long startTime = LogTime.getLogTime();
// 通过keyFactory工厂来构建一个EngineKey对象,key关联着model,也就是URL,它会根据model,view的宽高等 等属性来构建一个EngineKey对象,这个对象可以用来指定缓存地址,可以用来从缓存中查找资源等
EngineKey key = keyFactory.buildKey(model, signature, width, height, transformations,
resourceClass, transcodeClass, options);
EngineResource<?> cached = loadFromCache(key, isMemoryCacheable);
if (cached != null) {
// 获取LruResourceCache缓存资源成功则回调来直接设置图片
cb.onResourceReady(cached, DataSource.MEMORY_CACHE);
if (Log.isLoggable(TAG, Log.VERBOSE)) {
logWithTimeAndKey("Loaded resource from cache", startTime, key);
}
return null;
}
EngineResource<?> active = loadFromActiveResources(key, isMemoryCacheable);
if (active != null) {
// 获取ActiveResourceCache缓存资源成功则回调来直接设置图片
cb.onResourceReady(active, DataSource.MEMORY_CACHE);
if (Log.isLoggable(TAG, Log.VERBOSE)) {
logWithTimeAndKey("Loaded resource from active resources", startTime, key);
}
return null;
}
EngineJob<?> current = jobs.get(key);
if (current != null) {
current.addCallback(cb);
if (Log.isLoggable(TAG, Log.VERBOSE)) {
logWithTimeAndKey("Added to existing load", startTime, key);
}
return new LoadStatus(cb, current);
}
EngineJob<R> engineJob = engineJobFactory.build(key, isMemoryCacheable,
useUnlimitedSourceExecutorPool);
DecodeJob<R> decodeJob = decodeJobFactory.build(
glideContext,
model,
key,
signature,
width,
height,
resourceClass,
transcodeClass,
priority,
diskCacheStrategy,
transformations,
isTransformationRequired,
onlyRetrieveFromCache,
options,
engineJob);
jobs.put(key, engineJob);
engineJob.addCallback(cb);
engineJob.start(decodeJob);
if (Log.isLoggable(TAG, Log.VERBOSE)) {
logWithTimeAndKey("Started new load", startTime, key);
}
return new LoadStatus(cb, engineJob);
}
1
2
3
4
5
6
7
8
9
10
11
12
private EngineResource<?> loadFromCache(Key key, boolean isMemoryCacheable) {
if (!isMemoryCacheable) {
return null;
}
EngineResource<?> cached = getEngineResourceFromCache(key);
if (cached != null) {
cached.acquire();
activeResources.put(key, new ResourceWeakReference(key, cached, getReferenceQueue()));
}
return cached;
}
1
2
3
4
5
6
7
8
9
10
11
12
13
14
15
16
17
18
private EngineResource<?> loadFromActiveResources(Key key, boolean isMemoryCacheable) {
if (!isMemoryCacheable) {
return null;
}
EngineResource<?> active = null;
WeakReference<EngineResource<?>> activeRef = activeResources.get(key);
if (activeRef != null) {
active = activeRef.get();
if (active != null) {
active.acquire();
} else {
activeResources.remove(key);
}
}
return active;
}

  • 当我们需要显示某个资源时,Glide会先去查找LruResourceCache,找到了则将从LruResourceCache移除加入到ActiveResourceCache
  • LruResourceCache找不到资源则查找ActiveResourceCache
  • 如果在ActiveResourceCache也找不到合适的资源,则会根据加载策略从硬盘或者网络加载资源
  • 分别使用engineJobFactory和decodeJobFactory构建EngineJob和DecodeJob对象,这两个对象是真正的加载资源的两个重要类,EngineJob对象负责开启线程去加载资源,并且加载到资源后转换到子线程并进行回调,DecodeJob是真正的执行者,它就是网络加载资源的地方,EngineJob开启线程,真正执行的是DecodeJob,DecodeJob执行完毕之后回到EngineJob去分发回调
  • 获取数据后Glide会从BitmapPool中找寻合适的可供内存复用的废弃recycled bitmap(找不到则会重新构建bitmap对象),然后刷新bitmap的数据
  • bitmap被转换封装为Resource缓存入ActiveResourceCache和Request对象中
  • Request的target会获取resource中引用的bitmap并展示
  • 当target的资源需要release时,resource会根据缓存策略被缓存到LruResourceCache,同时ActiveResourceCache中的弱引用会被删除。如果该资源不能缓存到LruResourceCache,则资源被recycle到BitmapPool
  • 当需要回收内存时(比如系统内存不足或者生命周期结束),LruResourceCache将根据LRU算法recycle一些resource到BitmapPool
  • BitmapPool会根据缓存池的尺寸和recycled resource的缓存策略来缓存resource的bitmap
  • BitmapPool会根据LRU算法和缓存池的尺寸来释放一些老旧资源
  • 当系统GC时,则会回收可回收的资源释放内存

再来看一下Glide内存复用机制
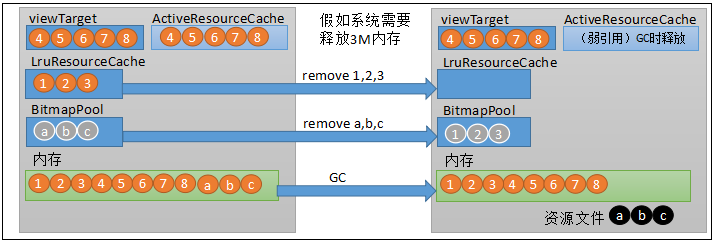
如图,当系统内存不足时,LruResourceCache会根据LRU算法移除一些资源(resource)到BitmapPool,到Bitmap会根据LRU算法移除一些资源(bitmap),当应用再次需要资源时,会有限复用到BitmapPool中的bitmap对象(复用其内存),只需刷新bitmap的像素数据。这样能有效地降低内存抖动,由于很多情况下可以复用废弃bitmap的内存,因此避免了内存分配等造成的性能损耗,系统比较流畅,降低了系统GC的频率。

Glide的网络请求原理

从上文可知,DecodeJob是网络加载资源的地方,DecodeJob实现了Runnable,下面看一下其run()方法。

1
2
3
4
5
6
7
8
9
10
11
12
13
14
15
16
17
18
19
20
21
22
23
24
25
26
27
28
29
30
@Override
public void run() {
TraceCompat.beginSection("DecodeJob#run");
try {
if (isCancelled) {
notifyFailed();
return;
}
runWrapped();
} catch (RuntimeException e) {
if (Log.isLoggable(TAG, Log.DEBUG)) {
Log.d(TAG, "DecodeJob threw unexpectedly"
+ ", isCancelled: " + isCancelled
+ ", stage: " + stage, e);
}
if (stage != Stage.ENCODE) {
notifyFailed();
}
if (!isCancelled) {
throw e;
}
} finally {
if (currentFetcher != null) {
currentFetcher.cleanup();
}
TraceCompat.endSection();
}
}

追踪到runWrapped()方法。

1
2
3
4
5
6
7
8
9
10
11
12
13
14
15
16
17
private void runWrapped() {
switch (runReason) {
case INITIALIZE:
stage = getNextStage(Stage.INITIALIZE);
currentGenerator = getNextGenerator();
runGenerators();
break;
case SWITCH_TO_SOURCE_SERVICE:
runGenerators();
break;
case DECODE_DATA:
decodeFromRetrievedData();
break;
default:
throw new IllegalStateException("Unrecognized run reason: " + runReason);
}
}
1
2
3
4
5
6
7
8
9
10
11
12
13
14
15
16
17
private Stage getNextStage(Stage current) {
switch (current) {
case INITIALIZE:
return diskCacheStrategy.decodeCachedResource()
? Stage.RESOURCE_CACHE : getNextStage(Stage.RESOURCE_CACHE);
case RESOURCE_CACHE:
return diskCacheStrategy.decodeCachedData()
? Stage.DATA_CACHE : getNextStage(Stage.DATA_CACHE);
case DATA_CACHE:
return onlyRetrieveFromCache ? Stage.FINISHED : Stage.SOURCE;
case SOURCE:
case FINISHED:
return Stage.FINISHED;
default:
throw new IllegalArgumentException("Unrecognized stage: " + current);
}
}
1
2
3
4
5
6
7
8
9
10
11
12
13
14
private DataFetcherGenerator getNextGenerator() {
switch (stage) {
case RESOURCE_CACHE:
return new ResourceCacheGenerator(decodeHelper, this);
case DATA_CACHE:
return new DataCacheGenerator(decodeHelper, this);
case SOURCE:
return new SourceGenerator(decodeHelper, this);
case FINISHED:
return null;
default:
throw new IllegalStateException("Unrecognized stage: " + stage);
}
}
1
2
3
4
5
6
7
8
9
10
11
12
13
14
15
16
17
18
19
20
private void runGenerators() {
currentThread = Thread.currentThread();
startFetchTime = LogTime.getLogTime();
boolean isStarted = false;
while (!isCancelled && currentGenerator != null
&& !(isStarted = currentGenerator.startNext())) {
stage = getNextStage(stage);
currentGenerator = getNextGenerator();
if (stage == Stage.SOURCE) {
reschedule();
return;
}
}
if ((stage == Stage.FINISHED || isCancelled) && !isStarted) {
notifyFailed();
}
}

不难看出来,网络请求原理逻辑主要在currentGenerator.startNext()这句代码上面,而currentGeneric的实现类是SourceGenerator,所以可以定位到SourceGenerator的startNext()方法。

1
2
3
4
5
6
7
8
9
10
11
12
13
14
15
16
17
18
19
20
21
22
23
24
25
26
@Override
public boolean startNext() {
if (dataToCache != null) {
Object data = dataToCache;
dataToCache = null;
cacheData(data);
}
if (sourceCacheGenerator != null && sourceCacheGenerator.startNext()) {
return true;
}
sourceCacheGenerator = null;
loadData = null;
boolean started = false;
while (!started && hasNextModelLoader()) {
loadData = helper.getLoadData().get(loadDataListIndex++);
if (loadData != null
&& (helper.getDiskCacheStrategy().isDataCacheable(loadData.fetcher.getDataSource())
|| helper.hasLoadPath(loadData.fetcher.getDataClass()))) {
started = true;
loadData.fetcher.loadData(helper.getPriority(), this);
}
}
return started;
}

SourceGenerator的startNext()方法最主要的逻辑在于while循环,关键代码是:

1
loadData.fetcher.loadData(helper.getPriority(), this);

loadData的fetcher实现类是HttpUrlFetcher,这是在Glide构造registry时候注册进去的实现类,所以其loadData()方法就是主要的实现逻辑。

1
2
3
4
5
6
7
8
9
10
11
12
13
14
15
16
17
18
19
20
21
@Override
public void loadData(Priority priority, DataCallback<? super InputStream> callback) {
long startTime = LogTime.getLogTime();
final InputStream result;
try {
result = loadDataWithRedirects(glideUrl.toURL(), 0 /*redirects*/, null /*lastUrl*/,
glideUrl.getHeaders());
} catch (IOException e) {
if (Log.isLoggable(TAG, Log.DEBUG)) {
Log.d(TAG, "Failed to load data for url", e);
}
callback.onLoadFailed(e);
return;
}
if (Log.isLoggable(TAG, Log.VERBOSE)) {
Log.v(TAG, "Finished http url fetcher fetch in " + LogTime.getElapsedMillis(startTime)
+ " ms and loaded " + result);
}
callback.onDataReady(result);
}
1
2
3
4
5
6
7
8
9
10
11
12
13
14
15
16
17
18
19
20
21
22
23
24
25
26
27
28
29
30
31
32
33
34
35
36
37
38
39
40
41
42
43
44
45
46
47
private InputStream loadDataWithRedirects(URL url, int redirects, URL lastUrl,
Map<String, String> headers) throws IOException {
if (redirects >= MAXIMUM_REDIRECTS) {
throw new HttpException("Too many (> " + MAXIMUM_REDIRECTS + ") redirects!");
} else {
try {
if (lastUrl != null && url.toURI().equals(lastUrl.toURI())) {
throw new HttpException("In re-direct loop");
}
} catch (URISyntaxException e) {
}
}
urlConnection = connectionFactory.build(url);
for (Map.Entry<String, String> headerEntry : headers.entrySet()) {
urlConnection.addRequestProperty(headerEntry.getKey(), headerEntry.getValue());
}
urlConnection.setConnectTimeout(timeout);
urlConnection.setReadTimeout(timeout);
urlConnection.setUseCaches(false);
urlConnection.setDoInput(true);
urlConnection.setInstanceFollowRedirects(false);
urlConnection.connect();
if (isCancelled) {
return null;
}
final int statusCode = urlConnection.getResponseCode();
if (statusCode / 100 == 2) {
return getStreamForSuccessfulRequest(urlConnection);
} else if (statusCode / 100 == 3) {
String redirectUrlString = urlConnection.getHeaderField("Location");
if (TextUtils.isEmpty(redirectUrlString)) {
throw new HttpException("Received empty or null redirect url");
}
URL redirectUrl = new URL(url, redirectUrlString);
return loadDataWithRedirects(redirectUrl, redirects + 1, url, headers);
} else if (statusCode == -1) {
throw new HttpException(statusCode);
} else {
throw new HttpException(urlConnection.getResponseMessage(), statusCode);
}
}

可以看到Glide的网络请求是基于我们平时比较熟悉的HttpURLConnection,通过HttpURLConnection的connect()方法连接网络获取文件数据流,把文件数据流拉取到内存之后,就开始了图片解码的工作。

Glide的解码工作还是比较复杂繁琐的,具体可以参照以下下面这篇博文。

android图片加载框架Glide4.0源码完全解析(二)